
HTTP Callout from Salesforce Flow - Without Using Code
As part of the Spring 23 release, Salesforce introduced a beta feature, using which we can make HTTP callouts from flow without writing a single line of code. This is definitely great news for all the flow lovers. Let us see this using a Google Blogger API.

1. Introduction
I want to consume Google Blogger API in a screen flow to see my blogger-related details. Let us see the step-by-step approach to set up this
2. Google API Access Set Up
1. Open your Google console
2. Create a new project

3. Open the Consent screen from Navigation Menu and do the basic set up

4. Add the basic detail including the App name, developer email, test user, etc and create the App
5. Once consent setup is completed, go to Credentials and create a new credential

6. We are going to consume OAuth authentication

7. Give a name for now and save it. We can update other details later.

8. You can see your client id and client secret. Take note of these values

9. Next step is to enable Blogger API for consumption
For that click on Enable APIs and services


3. Set up Salesforce Authentication
Now we need to set up Salesforce authentication to access this service from Flow. For that, we need to follow below steps:
1. Create Auth Provider
From set-up create a new Auth provider as shown in the below screenshot
Make sure to select the Provider Type as Open ID Connect and scope as openid:

2. Update the redirect URI in Google App
From the Auth provider, take the redirect URI:

And populate that in the Credentials of your Google project:
For that edit the Oauth credential from the Credentials navigation menu

And under Authorised redirect URI - add the value


Save the changes
3. Create Named Credential in Salesforce
From set-up ->Named Credential->Click on new Legacy
Enter details as shown below and save the named credential. It will automatically validate and authenticate using your Google Account and once you allow access to Salesforce to access google service, the named credential status will be shown as Authenticated.

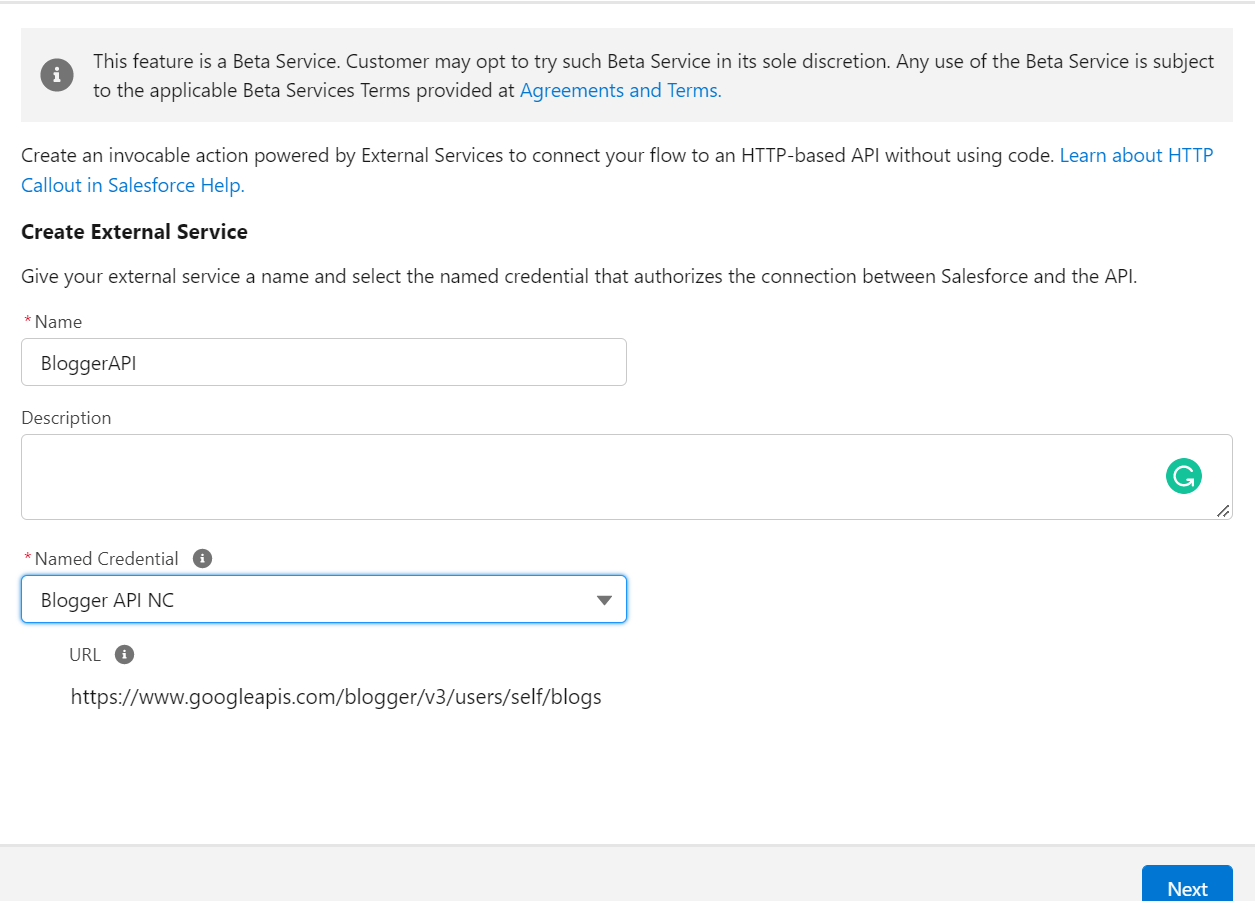
4. Consuming Google API from Flow
Let us create a new ScreenFlow and add an action.
When you select an action we can see a new option at the bottom now - Create HTTP Callout(Beta)

Click on that and you will get the below screen, where you are going to create the external service by selecting the named credentials we created just now.
When we click on next it will move to create an invocable action screen:

It also asks us to provide a sample response so that it can generate response Apex classes.

We can use Google Oauth Playground to execute the same service and generate the response:
This can be done in 3 steps:
1. Authorize the blogger API

2. Exchange Authorization Token

3. Configure Request API

Take this sample response and provide that as part of our invocable action screen:

Click on the Review button and it is going to give us the Response structure
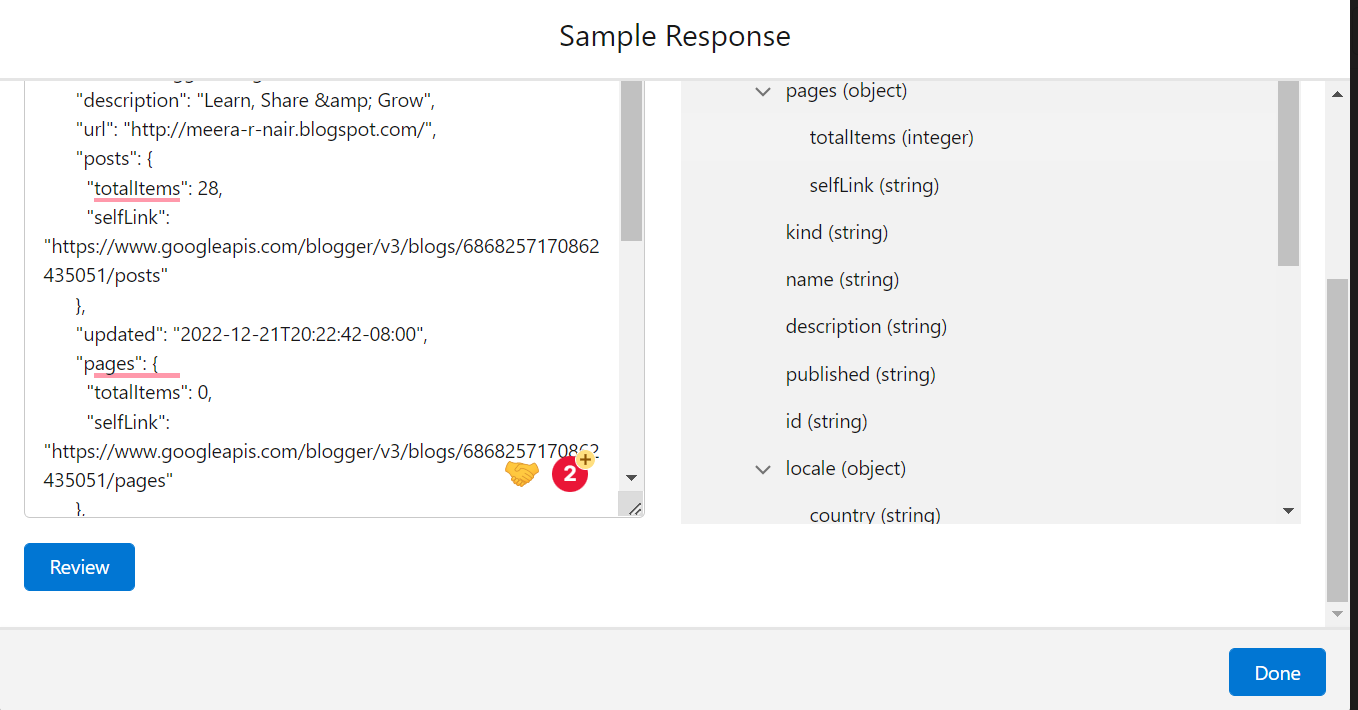
Once you click on Done - at the back end, this is going to create the External service and callable action apex classes:
External Service -

Invocable Apex Class Actions:

Each of these classes contains your response structure and this can be accessed inside flow to retrieve response details.
Now you can see this new invocable action is automatically selected as your action:

There is an Advanced section where you can map the response from callout to flow variables. There are 3 response parameters:
1. Response Code
2. Exception Details
3. Actual response

You can output all these variable values to a flow screen to see the response details:

if the response code is 200 - Then you can iterate over response to retrieve the blogger details:
Below is the auto generated Apex class and you can see it is giving us a list of items

And each item corresponds to a blog owned by me.
I am retrieving and displaying blog name and number of posts as part of that particular blog.
You can retrieve your blog details from the response as shown below:

So the final flow looks like the below:

My first screen where I display all the response details for verification looks like the below:

A response with exception looks like below:

And the screen which displays blog details after iteration:

So this is definitely going to be an exciting feature for low-code developers, to integrate Salesforce with external systems without writing even a single line of code.


Nice
ReplyDeleteWhat is responseVal ,responseCode?
ReplyDeleteThank you for this informative and well-structured blog post on AWS training and certification. As someone who is looking to advance in their cloud computing career, I found the information provided here incredibly valuable. Please visit our website:- aws training and certification
ReplyDeleteTransform your CRM with a top Salesforce consultant. We provide tailored solutions for streamlined workflows, enhanced data management, and optimized sales processes. Maximize efficiency and drive growth with our expert Salesforce consulting services.
ReplyDeleteThanks for this great post! It's awesome to see how the new beta feature in Spring ’23 lets low‑code users make HTTP callouts from Salesforce Flow, especially using real‑world examples like the Google Blogger API. Super helpful and easy to follow.
ReplyDeleteRead more - Salesforce SMS App