
Salesforce Asynchronous Execution Approaches - Low-Code, Pro- Code and Hybrid
Salesforce Asynchronous Execution Approaches - Low-Code, Pro- Code and Hybrid
Salesforce gives us multiple ways by which we can execute functionalities asynchronously. But why we need asynchronous mode of execution? What are it’s advantages? What are the different approaches by which we can execute functionalities asynchronously in salesforce and how are they different. We are going to see all these details as part of this blog.
Overview
We are going to discuss below points as part of this blog:
What is a transaction in Salesforce
A transaction is a related set of operations or actions which are executed in a sequential manner, when some record changes are happening in Salesforce - manually or by an automated process. As an example, when a user tries to create a new Opportunity in salesforce from user interface, it will trigger a sequence of actions at the back end which includes, firing validation rules on opportunity, running customization logic implemented through Flows/Triggers etc. This Salesforce blog gives us details about different operations that can occur as part of a transaction and it’s order of execution.What is synchronous & asynchronous mode of execution
Synchronous Execution

The above diagram shows, how synchronous transaction works. Here transaction executes 3 actions in sequential order, one after the other. Meaning Action 2 is called/executed only after Action 1 is completed. Similarly Action 3 is executed only after Action 2 has been completed. When 3 actions are executed, the transaction is also marked as completed.
Asynchronous Execution
 In the above diagram we can see that Action 2 is called asynchronously, once Action 1 is completed. But without waiting for the Action 2 completion, Action 3 is called and getting executed. So here Action 2 is getting executed as a completely separate transaction at the backend, and Transaction 1 never waits for Action 2 response to execute Action 3. This mode of execution is called asynchronous execution.
Where we can use asynchronous mode of Execution
Asynchronous mode of execution help us to solve many transaction related issues:- Performance - When there are long running processes, which affects the performance of current transaction, we can move that process to asynchronous mode to improve performance of current transaction
- Integration - When we need to call an external system from a trigger execution, we need asynchronous mode
- Mixed DML Exception - When we need to update both set-up and non-set up objects together, to avoid mixed DML exception, we can move one of those updates to asynchronous mode
- Recursive Execution - When we update a child record in a parent record update transaction and it in turn updates the parent again, it can lead to recursive execution. So this kind of behaviors can be controlled by moving child record update to asynchronous mode
Different asynchronous execution approaches in Salesforce and considerations
Below table shows different asynchronous execution options available in Salesforce:| SN | Approach | Implementation Complexity | Considerations |
| 1 | Flow Scheduler | Low Code | 1. Implementation and maintenance effort is less 2. Can schedule one time, daily or weekly only, we cannot do flexible scheduling like execute twice per day 3. Used for bulk record processing 4. Not suitable for complex logic Implementation |
| 2 | Flow with Async path | Low Code | 1. Implementation and maintenance Effort is less 2. Similar to Trigger with future or queueable 3. If operation updates some values on the screen, updates are visible near real time 3. Not efficient for complex logic implementation |
| 3 | Platform Event with Flow subscription | Low Code | 1. Implementation and maintenance Effort is less 2. Need to consider Platform Event related limits mentioned here |
| 4 | Flow with Async Apex Action | Hybrid | 1. Implementation and maintenance effort is average 2. Can move complex logic to apex Action 3. Need to consider future limits mentioned here |
| 5 | Change Data Capture with Asynchronous Trigger | Hybrid | 1. Implementation and maintenance effort is average 2. Refer Change Data Capture related limits mentioned here 3. CDC Add-on license is needed 4. Change Event record will hold all kind of insert, update, delete, undelete details. We need to filter records based on our criteria 5. Update Change Event just hold changed fields only |
| 6 | Platform Event with Trigger Subscription | Hybrid | 1. Implementation and maintenance effort is average 2. More flexible compared to CDC, since we can always fire only when needed and can contain all required information 3. Need to consider Platform Event related limits mentioned here |
| 7 | Trigger with Future Method | Pro Code | 1. Implementation and maintenance effort is high 2. Can be used to implement complex requirements 3. Cannot chain different future methods 4. Need to consider future related limits mentioned here |
| 8 | Trigger with Queueable Method | Pro Code | 1. Implementation and maintenance effort is high 2. More flexible compared to future methods 3. Better transaction control through transaction finalizers 4. Can chain different queueable method execution 5. Need to consider queueable related limits mentioned here |
| 9 | Batch Apex | Pro Code | 1. Implementation and maintenance effort is high 2. Suitable for processing large number of records 3. Can maintain state between different batches of the same job 4. Can be executed from Trigger or Scheduler 5. Need to consider Batch apex related limits mentioned here |
| 10 | Apex Scheduler | Pro Code | 1. Implementation and maintenance effort is high 2. Can be used to schedule Batch Apex based on required frequency 3. More flexible than Flow scheduler 4. Need to consider Apex scheduler related limits mentioned here |
Implementation Use Case
To understand the different asynchronous approaches, let us consider a small scenario: Account and Contact have an Active picklist field which contains values as “Yes” and “No”. Whenever the parent Account’s Active field value is becoming “No”, the child contact’s Active value also should become No. That is whenever Account is getting deactivated child contacts also should be deactivated.Implementation Details
If we do not want to get child contacts deactivated immediately, we can always move this to asynchronous execution. Let us consider how we can implement this using different asynchronous execution approaches.Approach 1 : Flow Scheduler
Since this is a scheduled flow, we need to have specific criteria to identify records that needs to be processed. So we are creating a checkbox called “Update Contacts”, that will be set true when Account, Active value is becoming “No”. The flow is as shown below:
And then we need to create a scheduled flow as shown below, to fetch those account records with, Update Records = Yes. After processing we need to toggle Update Record value to false.

You can see that here this flow is going to get executed daily. And we can see it’s scheduled details under Scheduled jobs, as shown below:
 Like we discussed, only available execution frequency is Once, Daily and Weekly. We will not be able to have a flexible scheduling using this.
Approach 2 - Flow with asynchronous path
This is another great feature from flow when we can mention both synchronous and asynchronous execution path as part of a flow. The implementation looks like below:
You can see the Run Asynchronously path. So this will get executed when system resources are available, and we can see it as a separate transaction under debug logsApproach 3 - Platform event with flow subscription
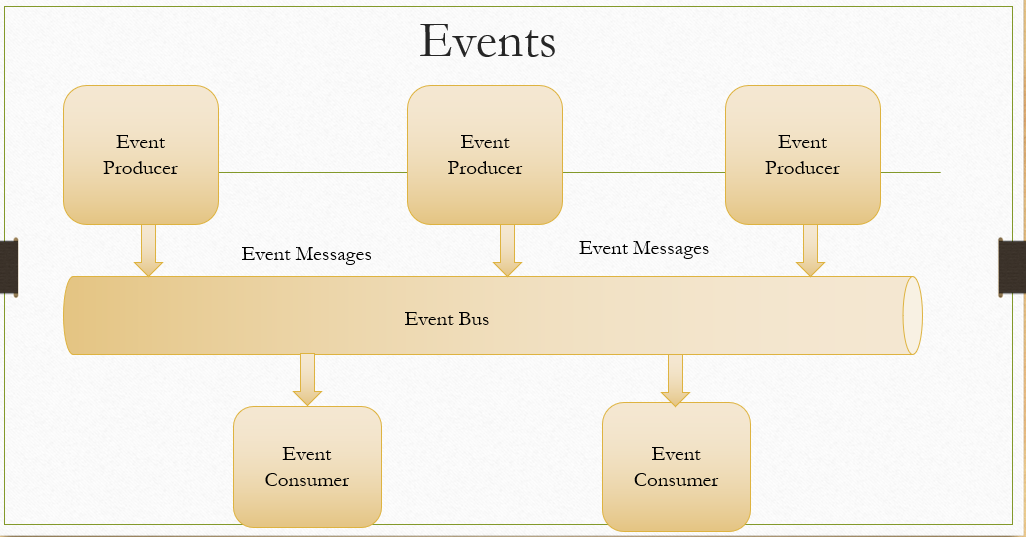
Platform events are powerful mode of integrating salesforce with external systems, especially when we want to send same event messages to multiple systems. But in addition to this we can use this to bring asynchronous execution mode internally.
For our scenario, we can define a new platform event with required fields: Then we can create a new Flow to publish this platform event when Account Active checkbox value is becoming false:
We can subscribe to this platform event again using another flow: And our flow looks like below:
 If we need to debug details of Platform Event subscription we need to enable debug log for Automated Process.
Approach 4 - Flow with Asynchronous Apex action
In this approach we can have a record triggered flow, which will check for condition and get ids of accounts which got deactivated. Then flow can call an Apex action, which will be executed asynchronously.
The called Apex method contains another function call which is a future method actually. The code is like below:@InvocableMethod(label='Deactivate Contacts' description='Contact deactivation')
Instead of future method we can execute Queueable method also.
public static void deativateContact(List<id> accids){
//Call future method
deactivatecontactfuture(accids);
}
@future
public static void deactivatecontactfuture(List<id> accids){
try{
//retrieve active contacts under this accounts
List<Contact> conList = new List<Contact>();
for(Contact con:[select id from Contact where accountid IN :accids]) {
con.active__c = 'No';
conList.add(con);
}
//If active contacts exists deactivate them
if(conList.size()>0){
update conList;
}
}catch(Exception ex){
System.debug('Exception occured:'+ex.getMessage());
}
}Approach 5 - Change Data Capture with Asynchronous Trigger
Change Data Capture is similar to Platform events, but difference is that this can be enabled on some standard objects and all custom objects. And once enabled, automatically changes will be logged into <SObject>ChangeEvent object as a new record. So less control on the logged details compared to Platform events.
First we need to enable Change Data Capture on Account Object.
Once this is enabled, whenever an Account record is getting created, updated, deleted or undeleted a new entry will be added to AccountChangeEvent object. We can write trigger on this object and this will be getting executed as a separate transaction:/***********************************************************************
* Trigger on Account change event to deactivate child contacts on
* account deactivation
*
* ********************************************************************/
trigger AccountChangeEventTrigger on AccountChangeEvent (after insert) {
set<id> accids = new set<id>();
try{
for(AccountChangeEvent ace : Trigger.new){
System.debug(ace);
System.debug(ace.id);
//Check header details to get operation type and changed field details
EventBus.ChangeEventHeader header = ace.ChangeEventHeader;
if(header.changetype == 'UPDATE' && header.changedfields.contains('Active__c')){
accIds.add(ace.Id);
}
}
//If there are account changes satisfying the criteria, call method to update active contacts
if(accids.size()>0){
ContactDeactivation.deativateContactsync(accids);
}
}catch(Exception ex){
System.debug('Exception occured:'+ex.getMessage());
}
}Approach 6 - Platform Event with Trigger Subscription
Similar to approach 3(Platform event with flow subscription), but can be used to process more complex logic.
The trigger which is subscribed to platform event looks like below:/****************************************************************
This is similar to subscribing Change Data Capture using trigger.
* Trigger on Account platform event to deactivate Accounts
* on contact deactivation
* *************************************************************/
trigger AccountEventTrigger on Account_ev__e (after insert) {
//check if Account is inactive
List<id> accids = new List<id>();
try{
for(Account_ev__e accev : Trigger.new){
if(accev.isActive__c == 'No'){
accids.add(accev.AccountID__c);
}
}
if(accids.size()>0){
ContactDeactivation.deativateContact(accids);
}
}catch(Exception ex){
System.debug('Exception occured:'+ex.getMessage());
}
}Approach 7 - Trigger with Future Method
In the account trigger, we can apply criteria to find out accounts which got deactivated. If there are records, satisfying the criteria, we can call future method for contact deactivation./****************************************
The @future will be executed as a separate transaction and we can track it as future method under debug logs.
* Account Trigger
*
* ***************************************/
trigger AccountTrigger on Account (after update) {
List<id> accIds = new List<id>();
//Check if after update
if(Trigger.isupdate && Trigger.isafter){
for(Account acc:Trigger.new){
if( acc.Active__c != Trigger.oldMap.get(acc.Id).Active__c && acc.Active__c == 'No'){
accIds.add(acc.id);
}
}
//call future method
if(accIds.size()>0){
ContactDeactivation.deactivatecontactfuture(accids);
}
}
}Approach 8 - Trigger with Queueable Method
This is similar to Approach 7, but Queueable has got more advantages with respect to parameters it supported, support of asynchronous process chaining etc. This will be called from Account Trigger and logic is same as Approach 7./****************************************
* Account Trigger
*
* ***************************************/
trigger AccountTrigger on Account (after update) {
List<id> accIds = new List<id>();
//Check if after update
if(Trigger.isupdate && Trigger.isafter){
for(Account acc:Trigger.new){
if( acc.Active__c != Trigger.oldMap.get(acc.Id).Active__c && acc.Active__c == 'No'){
accIds.add(acc.id);
}
}
//Call queueable method
if(accIds.size()>0){
ContactDeactivationQueueable myq = new ContactDeactivationQueueable(accIds);
ID jobID = System.enqueueJob(myq);
}
}
And the Queueable method looks like below which implements Queueable interface:/***********************************************
* Queueable class to deactivate contacts
*
* *********************************************/
public class ContactDeactivationQueueable implements Queueable{
private List<id> accids ;
public ContactDeactivationQueueable(List<id> accids) {
//set variables
this.accids = accids;
}
public void execute(QueueableContext context) {
//retrieve active contacts under this accounts
List<Contact> conList = new List<Contact>();
try{
for(Contact con:[select id from Contact where accountid IN :accids]) {
con.active__c = 'No';
conList.add(con);
}
//update if there exists active contacts
if(conList.size()>0){
update conList;
}
}catch(Exception ex){
System.debug('Exception occured:'+ex.getMessage());
}
}
}Approach 9 - Batch Apex
Implements Database.Batchable Interface. There are multiple approaches by which we can execute a batch job:- Execute anonymously
- Execute from Trigger
- Execute using Scheduler
/***************************************************************************************
 * Batch Apex class to deactivate contacts
 *
 * ************************************************************************************/
public with sharing class Batch_ContactDeactivation implements Database.Batchable<sObject>{

    String active = 'Yes';
    String inactive = 'No';
    String query = 'select id from Contact WHERE account.Active__c=:inactive AND Active=:active';

    //Batch start function
    public Database.QueryLocator start(Database.BatchableContext BC){

      return Database.getQueryLocator(query);
     }

      //Execute function
    public void execute(Database.BatchableContext BC, List<sObject> scope){
     try{
          for(sobject s : scope){
            s.put('Active__c',inactive);
          }
          update scope;
     }catch(Exception exc){
       System.debug('Exception happened:'+exc.getMessage());
     }
    }

   //finish method
   public void finish(Database.BatchableContext BC){
        // Get the ID of the AsyncApexJob representing this batch job
        // from Database.BatchableContext.
        // Query the AsyncApexJob object to retrieve the current job's information.
        AsyncApexJob a = [SELECT Id, Status, NumberOfErrors, JobItemsProcessed,
            TotalJobItems, CreatedBy.Email
            FROM AsyncApexJob WHERE Id =
            :BC.getJobId()];
            System.debug('Finished job details:'+a);
        // Send an email to the Apex job's submitter notifying of job completion.
        Messaging.SingleEmailMessage mail = new Messaging.SingleEmailMessage();
        String[] toAddresses = new String[] {a.CreatedBy.Email};
        mail.setToAddresses(toAddresses);
        mail.setSubject('Contact Deactivation Process: ' + a.Status);
        mail.setPlainTextBody
        ('The batch Apex job processed ' + a.TotalJobItems +
        ' batches with '+ a.NumberOfErrors + ' failures.');
        Messaging.sendEmail(new Messaging.SingleEmailMessage[] { mail });
   }
}
Approach 10 - Apex Scheduler
Apex Scheduler gives us the flexibility to run specific functionalities at specific time. We can schedule normal Apex class functionality or Batch Apex from a scheduler. Compared to Flow Scheduler, this has more flexibility on when needs to be executed. For example if we need to execute our contact deactivation logic twice per day we can do that using Apex scheduler./*****************************************
The above class can be scheduled in 2 ways.
* Scheduler class for Contact Deactivation
*
* ***************************************/
global class ContactDeactivationScheduler implements Schedulable {
global void execute(SchedulableContext sc) {
//Call Batch Apex
Batch_ContactDeactivation batch = new Batch_ContactDeactivation();
database.executebatch(batch);
}
}- Directly from UI - using Schedule apex option available as pat of Apex Class list

- Or using CRON expression like mentioned below:
ContactDeactivationScheduler sch = new ContactDeactivationScheduler();
String frequency = '0 0 8,20 * * ?';//Runs every day at 8AM and 8PM
String jobID = system.schedule('Merge Job', frequency, sch);
Advantages of asynchronous execution
So we have seen different approaches by which we will be able to execute functionalities asynchronously in Salesforce. Let us summarize asynchronous execution advantages:


Nicely explained and documented and great thanks
ReplyDeleteWell articulated. Thank you so much for putting everything into one article. Thanks for sharing ☺️
ReplyDelete
ReplyDeleteSalesforce Training Institute in Gurgaon
Excellent post. You have shared some wonderful tips. I completely agree with you that it is important for any blogger to help their visitors. Once your visitors find value in your content, they will come back for more Salesforce CRM Consulting .
ReplyDeleteSalesforce Training Institute in Noida
ReplyDeleteHi, I read your whole blog. This is very nice. Good to know about the Salesforce and is very demanding in future. We are also providing various SalesforceTraining & Certification Courses, anyone interested can making their career in this field.
ReplyDeleteGreat blog, thanks for sharing. Best customized erp software development company
ReplyDeleteNice blog! erp software company in chennai.Thanks for sharing.
ReplyDeleteThis comment has been removed by the author.
ReplyDelete